You’ve probably spent hours online trying to select the best new set of wheels for your ride… and after finally deciding on the style, confirming the fitment, and placing the order, you think the hard part is over.
You’re not exactly right.
Yes – installing your new wheels is quick and easy to do.
But getting the job done right entails more than slapping them on and bolting them down. Which is why we’ve put together this quick guide on how you should install and break-in your new rims to ensure the longest wheel and tire life.
OK, here we go.
How to Install & Break-In New Wheels

1. Before you begin the installation, apply a coat of wax on your wheels. This will make them easier to clean down the line.
2. Loosen the lug nuts on your current wheels before you lift your vehicle.
3. Only lift (and support) your vehicle on a flat surface.
4. Position your new wheels at the spot where they will be installed around your vehicle. It’s important not to skip this step, especially if your new wheels or tires are directional or asymmetric. Locate any arrows and special branding on the sidewalls to figure out which side should be facing out.
5. Remove the lug nuts or bolts using a four-way wrench or other appropriate tool. If the lug nuts are frozen, you can remove them with a power wrench. But do so with caution. And consult your owner’s manual first.
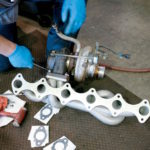
6. Inspect any studs and bolts as you’re loosening them. If they’re too rough, worn out, or damaged you should replace them before you install your new set of wheels. Clean out any dirt and remove rust from the hubs of your brake rotors and drums. Remove any temporary retaining devices, like stud clips. Remove your hub centering rings.
7. Make sure your new wheels fit like they’re supposed to – the bolt circles should be aligned, and the wheel should come into full contact with the hub’s mating surface. If your vehicle has drum brakes, and the drum’s outer flange or balance weights are extended beyond its center, you need to make sure that your new wheel fits against the hub, and not against the flange or weights.
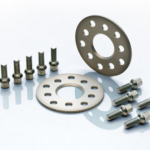
8. If you’re using new lug nuts and bolts, install them by hand before mounting your new wheel to ensure their thread size is correct. It’s a good idea to keep a set of your original lug nuts and bolts on hand – they’ll be useful if you ever need to use your spare.
9. Apply anti-seize lubricant around the axle hubs to ensure easy future removal for tire rotation, and to avoid rust. But take care not to apply the lubricant to the studs’ and lug nuts’ threads.
10. Put on the wheels and tighten the lug nuts and bolts with your hands.
11. With your vehicle in neutral, turn each of the wheels with your hands. You need to check that the disc brake caliper is not coming into contact with the inside of the rim, and that the side of the caliper is not touching the back of the wheel or the weights.
12. Now that you’ve made sure everything fits correctly, tighten the lug nuts in a criss-cross sequence following the manufacturer’s specs, using a calibrated torque wrench. Do not use a power wrench, and do not over-tighten.
13. You should re-torque your new set of wheels after the initial 100-150 km. They may have compressed slightly, in which case the lug nuts would have lost some of their torque.
14. Enjoy your new wheels!